![How to Engrave Wood With Cricut Maker? [Ultimate Guide]](https://img.theamberpost.com/1200x,jpeg/https://theamberpost.com/storage/posts/2023/12/27/70/ceX7aklJdmSlzK90PgbV3SYSOcqg30D6bDQ0a7Wg.jpg)
![How to Engrave Wood With Cricut Maker? [Ultimate Guide]](https://mannydesignspace.com/upload/blog/658be25b724f4how-to-engrave-wood-with-cricut-maker-ultimate-guide.webp)
Hi crafters! How are you all? It’s been a long time since I posted something for you. Also, I had no idea of coming forward. But recently, I got a request on my YouTube channel for engraving wood with the help of Cricut Maker. This idea seemed interesting to me, so I decided to make a post on it. Here, with the help of this blog, I will tell you how to engrave wood with Cricut Maker.
So, if you want to learn more about creating Cricut engraving crafts with the help of your Cricut Maker machine, then stick with me till the end. A pair of earrings is one of my favorite projects, and it can be yours, too. Ensure that you grab all the necessary items and supplies needed in order to make this project. Here we go!
Supplies and Tools You Will Need to Make Wood Earrings
As I already mentioned, you must collect all the necessary items; here is a list that you will need during the process. Have a look at it.
- Cricut Maker
- Engraving tip
- Basswood
- Knife blade
- StrongGrip mat
- Brayer
- Wood stain
- Jewelry pliers
- Sandpaper
- Jewelry findings
- Hole punch
When you know all the necessary items, it’s time for you to start making the project.
How to Engrave Wood With Cricut Maker for Creating a Project?
Once you gather all the items, you are good to go to make a beautiful project from it. I am making a pair of earrings with it. Are you all ready to learn it? Let’s go ahead.
Step 1: Design Your Project in Cricut Design Space
Before you actually start engraving the wood, you should know how you can design a project within the Design Space. So, let’s quickly see how you can design a project.
- In the first step, you should know which shape you want to engrave. The simpler the shape is, the better your project will look.
- Then, you should ensure that you select the machine model, as the engraving option is available only for this machine.
- You should know that you can’t use a knife blade on your iOS or mobile device. So, you can only use it on a computer.
- Now, select the shape that you want to engrave and then select the Engrave option to make an outline from it.
- If you want to add a font, select one stylish font for better results.
- You should add two engraved images on top of each other to make a deeper design in the wood.
- Lastly, you can use the contour feature to make even complicated designs simple.
Here, I am making engraved earrings with my Cricut Maker machine. In the next section, you will learn how to engrave wood with Cricut Maker.
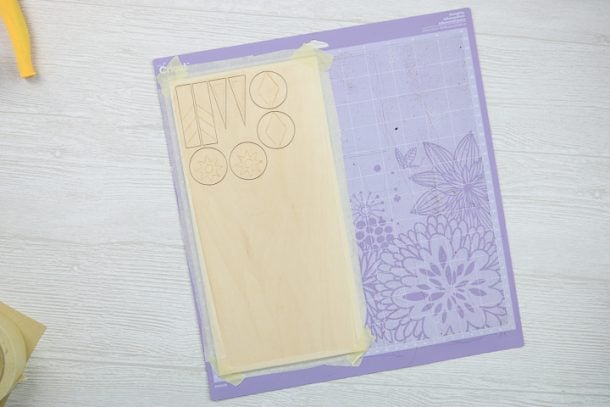
Step 2: Load Your Wood on the Mat
- When you are done with your design, it’s time to load your wood to your StrongGrip mat and press it well to stick it to one place. You should also tape it from all the edges.
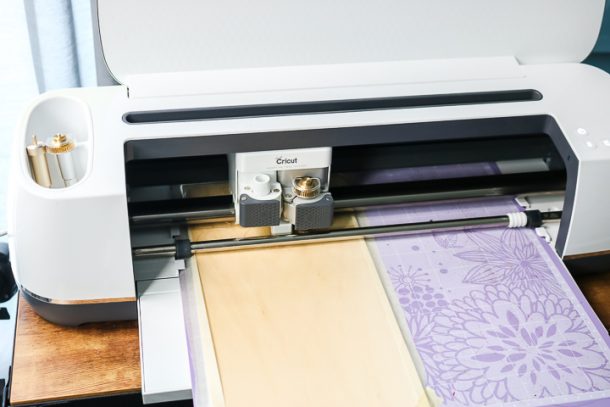
- Then, hit the Make It button on Design Space and try to fix your shape into the material. Note that you will not see the wood within the material options. So, you can select Tooling Leather.
- Now, you should load and unload your tools as your computer tells you to engrave and cut your design.
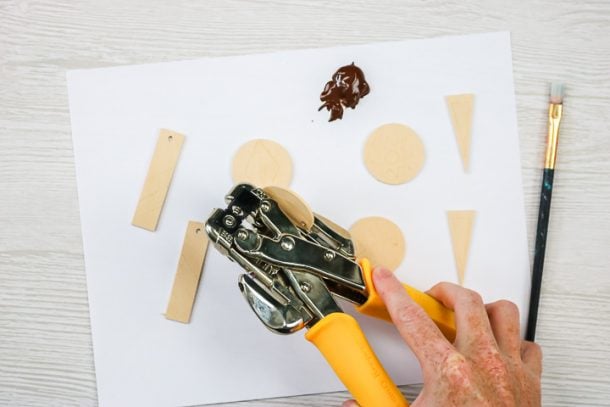
Step 3: Remove Your Cut Shapes From the Wood Panel
- When the cutting is done, remove your shapes from the wood panel. Then, you need to finish the corners using a craft knife and a cutting mat.
- It would be tough to engrave right after the machine. Therefore, you need to take a small piece of sandpaper and sand the wood pieces to remove the tough texture from it.
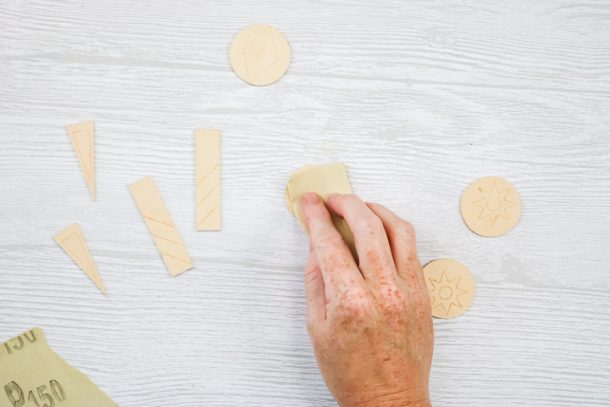
- In the next step, you should add holes to your wood pieces with an industrial hole punch. Ensure that you make a hole in the top center to make an earring out of it.
Step 4: Stain Your Wooden Pieces
- When you have made the holes, get ready to stain your wood. So, in the starting, stain each piece and let it dry.
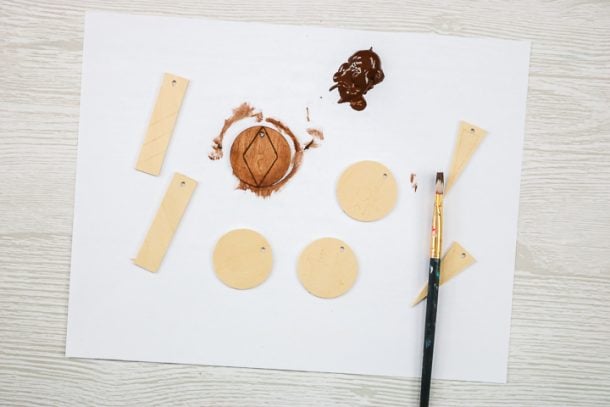
- Make sure that you stain all sides equally. Then, let the stain settle for a few seconds and remove the extra stain.
- When you are done with the front side of the earring, just turn the wood piece to the back and repeat the same steps.
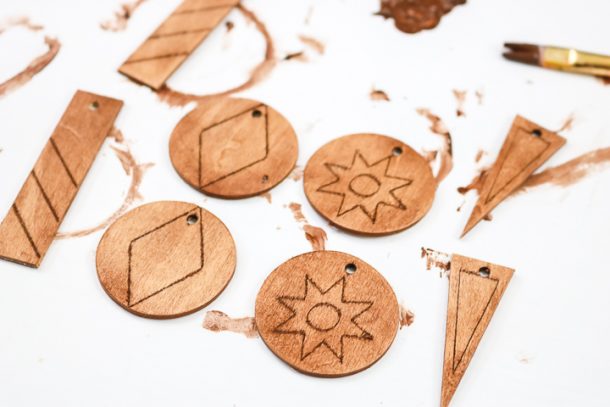
- Now, let them dry as well.
Step 5: Add Rings to Your Wood
- To make a perfect earring with your wood piece, you will need hooks and jump rings along with a pair of jewelry pliers.
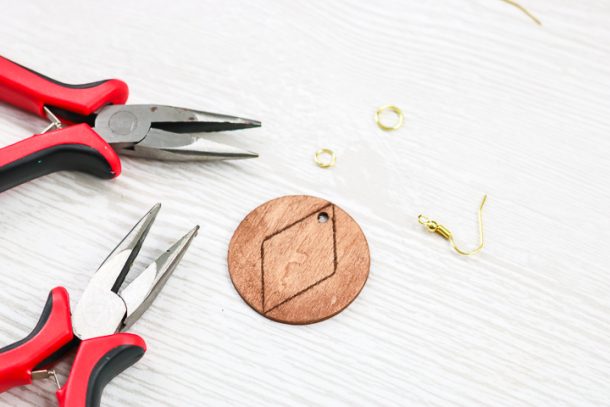
- Now, open the bigger jump rings with the help of pliers and fix them on your earrings.
- Then, close it and do the same with the smaller jump ring.
- Next, move it through the larger ring and then fix the hook and close it.
- At the end, you will have a beautiful engraved earring.

You can repeat these steps with the other wooden shapes you have cut in the beginning. It’s so simple to make such a beautiful accessory to give to someone.
Conclusion
You all have seen how to engrave wood with Cricut Maker. Isn’t it so easy? I know as a beginner it might be a little intimidating, but by applying the right methods, you will surely make a perfect project. Since I am a regular crafter, I can give you all the amazing ideas to utilize your Cricut Maker machine effectively. So, the earring is one of those simple and cute projects you should try. I will come up with more such ideas very soon.
FAQs
Can I Engrave Any Wood With Cricut Maker?
No, you can’t use any wood with your Cricut Maker. But you can use balsa wood, which is great for making projects with your Maker machine. This type of wood is not that tough and mostly comes in different thicknesses according to your project type. One of the reasons why baslawood is considered better is because of its ability to be easily cut and shaped into the desired form.
Can Cricut Explore 3 Engrave Wood?
Yes, Cricut Explore 3 can engrave wood. In the Cricut line-up, Cricut Maker 3 and Cricut Explore 3 are the two latest machines that can engrave wood, draw something, and emboss your various materials, whether soft or hard. If you are someone who likes to make something with wood, you should use Explore 3 easily.
How Much Wood Should Be Thick to Engrave by Cricut?
A Cricut Maker can engrave wood with a thickness of about 3/32”, which is about 2.4mm. Usually, balsa wood is used for engraving due to its soft nature. If you use other wood, you need to ensure that the thickness doesn’t exceed the maximum limit. This is how you can create a better engraving project with your Cricut Maker.
Read more: install cricut design space app

No comments yet