Installing Rogowski coils in current sensing systems involves several steps to ensure accurate and reliable measurements. Here's a step-by-step installation guide for Rogowski coils:
Step 1: Gather Necessary Tools and Equipment
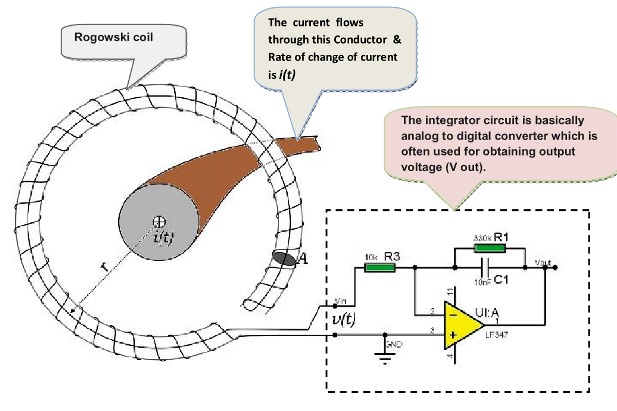
- Rogowski coils and their corresponding signal conditioning circuitry
- Current measurement device (such as an oscilloscope or data acquisition system)
- Power supply (if required for the signal conditioning circuit)
- Insulated gloves and safety equipment
- Cable ties and insulating materials
- Screwdrivers, pliers, and other basic tools
Step 2: Ensure Safety
- Turn off the power: Before working on any aimdynamics electrical equipment, make sure to turn off the power supply to the circuit you are working on.
- Use insulated gloves: Handling electrical components requires wearing insulated gloves to prevent electric shocks.
Step 3: Identify the Current-Carrying Conductor
Identify the conductor through which you want to measure the current. This conductor should pass through the center of the Rogowski coil for accurate measurements.
Step 4: Install the Rogowski Coil
- Open the Rogowski coil: If your Rogowski coil comes in a closed-loop design, open it and wrap it around the current-carrying conductor. If it's an open-loop design, thread the conductor through the center of the coil.
- Secure the coil: Use cable ties or other suitable methods to secure the Rogowski coil in place. Ensure it is tightly wrapped around the conductor without any gaps.
Step 5: Connect the Rogowski Coil to Signal Conditioning Circuitry
- Connect the Rogowski coil to the signal conditioning circuit: Follow the manufacturer's instructions to connect the Rogowski coil to the corresponding signal conditioning circuitry. This typically involves connecting the coil's output to the input of the signal conditioner.
- Connect the signal conditioner to the measurement device: If the signal conditioner requires power, connect it to a suitable power supply. Then, connect the output of the signal conditioner to your measurement device (oscilloscope, data acquisition system, etc.).
Step 6: Calibrate the System
- Calibrate the system: Calibrate the current sensing system as per the manufacturer's guidelines. This calibration ensures accurate measurements by accounting for any system-specific factors.
Step 7: Insulate and Secure the Setup
- Insulate the setup: Use insulating materials to cover exposed connections and components, ensuring that there is no risk of electric shock or short circuits.
- Secure the setup: Secure all the connections and components in place to prevent any movement or damage during operation.
Step 8: Test the System
- Test the current sensing system: Turn on the power and test the current sensing system, DC current sensor to ensure it is functioning correctly. Verify the measurements with the expected values to confirm accuracy.
Step 9: Monitor and Maintain
Regularly monitor the current sensing system to ensure it continues to function accurately. If any issues arise, troubleshoot the system following the manufacturer's guidelines or seek professional assistance if needed.
Always refer to the manufacturer's instructions and guidelines specific to the Rogowski coils and signal conditioning circuitry you are using, as different products may have unique installation requirements.
Additionally, if you are not experienced in working with electrical systems, it is advisable to seek assistance from a qualified professional during the installation process.
You Might Also Like: Common Mistakes to Avoid When Using Rogowski Coils for Current Sensing

No comments yet