In the increasingly competitive world of e-commerce, having high-quality product images is essential for driving sales and attracting customers. However, capturing the perfect shot is not always easy and often requires post-processing techniques to achieve the desired look. One such technique that has gained popularity in recent years is image masking. Image masking allows you to remove or isolate specific parts of an image, creating a clean and professional result. In this blog, we will provide a step-by-step guide to using image masking service for product photography.
Step 1: Choose the Right Image Masking Service
The first step to using image masking for your product photography is to select the right service provider. There are several options available, such as freelancers, online editing services, or even doing it yourself. However, it is recommended to go with a professional service that specializes in image editing, as they will have the experience and expertise to deliver high-quality results.
Step 2: Understand the Different Types of Image Masking
Before diving into the process, it is essential to understand the different types of image masking and when to use them. The most commonly used techniques are layer masking, channel masking, and alpha channel masking. Each technique has its benefits, and the choice will depend on the complexity of the image and the desired outcome.
Step 3: Prepare Your Images for Masking
Once you have chosen the right service provider and understood the different types of image masking, it is time to prepare your images for editing. The quality of the raw image plays a crucial role in the final result. Make sure to use a high-resolution image with proper lighting and a clean background. This will help the masking process to be more precise and accurate.

Step 4: Create a Masking Layer
The next step is to create a masking layer by selecting the appropriate tool in your image editing software. The most commonly used tool is the ‘pen tool,’ which allows you to draw an outline around the object that you want to mask. This tool can be tricky to use, so make sure to take your time and be precise with your strokes.
Step 5: Refine the Masking Layer
Once you have created the initial masking layer, it is time to refine it by zooming in on the image and making small adjustments. You can use tools such as the ‘brush tool’ or the ‘ellipse tool’ to refine the edges and make them smoother. This step is crucial in achieving a natural and polished look, so take your time and be patient.
Step 6: Verify the Masked Object
Once you have refined the masking layer, it is essential to verify if the masked object looks realistic. To do this, you can use the ‘Preview’ option or the ‘Quick Mask’ tool in your editing software to see the masked object in a different background. If it looks unrealistic or if you missed any spots, make the necessary adjustments until you are satisfied with the result.
Step 7: Save the Masked Object
After verifying and refining the masked object, it is time to save it. Make sure to save it in a format that supports transparency, such as PNG or PSD. This will allow you to place the object onto any background without any additional editing.
Step 8: Place the Object on a New Background
Now that the object is masked and saved, you can place it onto a new background. This is the fun part, as you can experiment with different backgrounds to see which one suits your product the best. Make sure to resize and position the object accurately to achieve a professional look.
Step 9: Make Final Adjustments and Enhancements
After placing the masked object onto a new background, you can make final adjustments and enhancements. This includes adjusting the brightness, contrast, and color balance to ensure that the image looks natural and appealing. You can also add shadows or reflections to make the product stand out.
Step 10: Save and Export the Final Image
The final step is to save and export the edited image in the desired format. Make sure to save a high-resolution version as well as a smaller version for web use. This will allow you to use the image across various platforms, such as your online store, social media, and marketing materials.
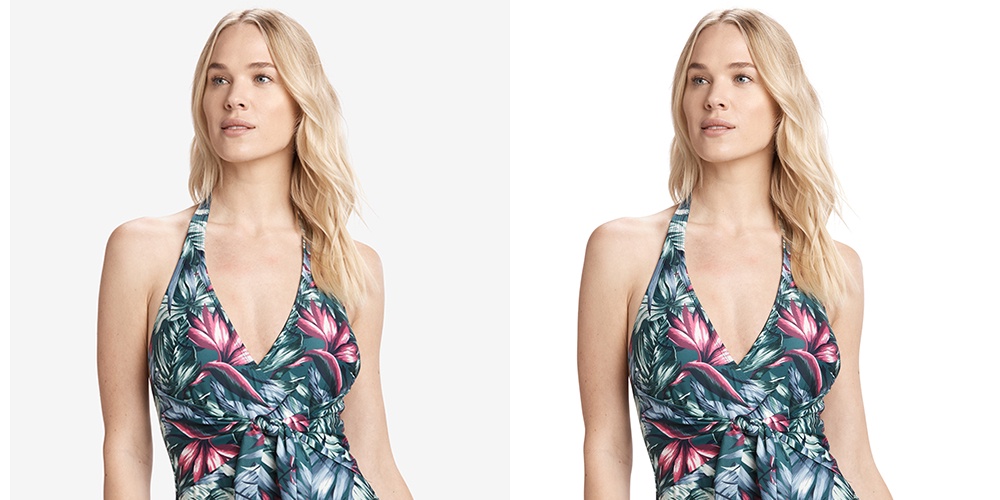
Image masking is an essential technique for achieving high-quality product images. It allows you to isolate and enhance specific parts of an image, creating a clean and professional result. By following this step-by-step guide, you can easily use image masking service for your product photography and take your e-commerce business to the next level.
Benefits of Using Image Masking Service
Image masking is a photo editing process that involves isolating a specific part of an image from the rest of the photo. This is often done to remove the background or to separate certain elements from the rest of the image. Image masking is a complex process that requires the use of advanced software and skills. This is why many businesses and photographers opt to outsource their image masking needs to professional service providers. Here are some of the benefits of using image masking service:
- Professional results:
One of the main benefits of using image masking service is the high quality, professional results you can expect. Professional photo editors have expertise in using advanced software and techniques to achieve seamless and precise image masking. This ensures that the end result is of the highest quality, with no visible marks or errors.
- Saves time and effort:
Image masking is a time-consuming process that requires a lot of skill and attention to detail. By outsourcing this task to a professional service provider, you can save a lot of time and effort. This allows you to focus on other important aspects of your business while the experts handle your image masking needs.
- Versatility:
Image masking is a versatile technique that can be used to achieve a wide range of effects. It can be used to remove the background of an image, create a transparent background, isolate specific elements, and more. Professional service providers have the skills and tools to implement various image masking techniques to suit your specific needs.
- Cost-effective:
Outsourcing your image masking needs can also be cost-effective in the long run. Instead of investing in expensive software and training your staff, you can simply pay a service provider to handle the task for you. This can save you money on equipment, software, and training costs.
- Consistency:
By using a professional image masking service, you can ensure consistency in the quality of your images. Service providers have strict quality control measures in place to ensure that every image is edited to the same high standards. This helps to maintain the overall professional look and feel of your brand.
- Improved aesthetics:
Image masking can significantly improve the aesthetics of your images. It allows you to remove distractions from the background and focus on the main subject, making the image more visually appealing. This can make a big difference in how your product or brand is perceived by potential customers.
Conclusion
Using image masking service offers numerous benefits for businesses and photographers. Not only does it provide professional and high-quality results, but it also saves time and effort, is cost-effective, and improves the overall aesthetics of your images. By outsourcing your image masking needs, you can focus on growing your business while leaving the complex and time-consuming task to the experts.

No comments yet