Introduction
When it comes to your home's plumbing, ensuring that your toilet is properly vented is crucial. Proper venting not only ensures the efficient functioning of your toilet but also plays a significant role in maintaining a healthy and odor-free bathroom environment. In this comprehensive guide, we will explore the importance of venting, the different venting options available, and the step-by-step process of venting a toilet properly.
Understanding the Importance of Venting
Why Is Venting Necessary?
Before delving into the specifics of venting a toilet, it's essential to understand why it is necessary. Venting serves two primary purposes in your plumbing system:
-
Preventing Air Locks: Without proper venting, water can create air locks in the pipes, which hinder the flow of wastewater and can lead to clogs and slow drainage.
-
Eliminating Odors: Vent pipes help to release sewer gases and unpleasant odors safely outside your home, keeping your bathroom fresh and hygienic.
Legal Requirements
In many areas, building codes require proper venting as a safety measure to prevent sewer gases from entering your living space. Non-compliance can lead to costly repairs and health hazards.
Types of Venting Systems
Understanding the different types of venting systems is crucial for choosing the one that best suits your needs.
1. Individual Venting
- The simplest method, where each plumbing fixture has its own vent pipe.
- Ensures efficient drainage and minimizes the risk of clogs.
2. Common Venting
- Multiple fixtures share a single vent pipe.
- Suitable for bathrooms with closely situated fixtures.
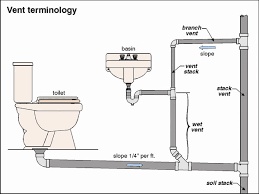
3. Wet Venting
- Combines venting and drainage in one pipe.
- Ideal for smaller bathrooms and tight spaces.
Venting a Toilet: Step by Step
Now, let's walk through the process of venting a toilet properly.
1. Gather Your Tools and Materials
- Vent pipe
- Fittings
- Vent cap
- Pipe hangers
- Saw
- Pipe glue
- Vent flashing
2. Plan Your Venting Route
- Determine the best route for your vent pipe, ensuring it slopes upward and connects to the main vent stack.
3. Cut the Pipe
- Measure and cut the vent pipe to the appropriate length.
- Use a saw to make precise cuts.
4. Install Fittings
- Connect the pipe to your toilet's drain pipe using the appropriate fittings.
- Ensure a secure and airtight connection.
5. Secure the Vent Pipe
- Use pipe hangers to secure the vent pipe along its route.
- Maintain a consistent slope for proper drainage.
6. Install the Vent Cap
- Attach a vent cap to the upper end of the vent pipe.
- This prevents debris and pests from entering the vent.
7. Vent Flashing
- Install vent flashing on your roof to ensure a watertight seal.
- This is essential to prevent leaks and damage.
Conclusion
Properly venting a toilet is a crucial aspect of maintaining your home's plumbing system. It not only ensures the efficient flow of wastewater but also keeps your bathroom free from unpleasant odors. Understanding the different venting systems and following the step-by-step process for installation is essential for a well-functioning toilet.
Get started on ensuring your toilet is correctly vented. Proper maintenance and installation can save you from costly repairs and contribute to a cleaner, more comfortable home environment.

No comments yet