Steam is an amazing well-known online game platform which is widely used to manage games with ease. It offers great gaming experience to the users, but there are also some problems like steam connection error, steam game itself uninstalled, failed to load a file and more. But most commonly, you must have noticed an error message which says ‘could not connect to steam network’ popping up on the screen while trying to login into the steam account. If you have faced this issue, then the very first step that you can do is to restart your computer. This can help to clear up all the crashes of the software, any driver issues and then just reset your network settings which will most probably help you and fix your issue of steam not connecting error.
But in case this method fails to work, then we have mentioned below details of 4 solutions that will definitely work out and help you to resolve the issue. So scroll down and check out.
4 Solutions to fix if your computer could not connect to steam network
So there are 4 solutions to solve the issue of steam not connecting error which usually eros when a user tries to login into the steam account. So they are as follows-
- Try to change your steam’s internet protocol- So it is observed in a lot of cases that the UDP, which is User Datagram Protocol (an original internet protocol for most of the steam users) does not work properly and becomes unstable. So if this also happens with you, then you can try changing it to TCP, which is Transmission Control Protocol, as it is much faster and reliable.
So thus, if you face the issue of ‘not able to connect to the steam network’, then you can just try to change it and here is how you can do it-
- If you have the shortcut of steam on your desktop, then just right click on it and select properties.
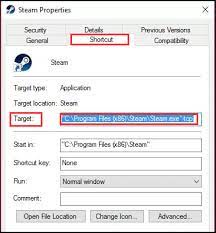
- Then, in the window of properties, go to the shortcut tab.
- Then, add -tcp to the end in the target dialogue box where the complete next line will become like- “C:/Program Files…….-tcp.
And after all these steps, you can now relaunch your steam client and check if
‘could not connect to steam network’ error is fixed or not.
- Check if your internet connection works and operates properly or not- In addition to the first solution, you can also check if your internet connection is working normally or not. And it is also easy to operate. All you need to do is open the browser and check if your computer is able to connect to the internet normally as usual. Below mentioned are some simple steps to do it-
- Start with pressing the Win+X keys to open the context menu and then select the device manager from the menu.
- Then, navigate to the network adapter in the window that pops up and expand it. Then you will see a list of LAN or Wifi adapters mentioned with their official name.
- Then, just double tap on one adapter to open the window of properties and check if there is any window which says ‘this device is working well and proper’. And here this way you can check all the adapters one by one.
- And then if you made any possible changes in your network settings, you just have to revert all of them by running some certain commands.
- You can open the run box by pressing Win+R keys and then type ‘cmd’ in in the box and hit the ‘enter’ button.
- Now, further type these below mentioned commands and also hit ‘enter’ after each command.
- ipconfig/all
- ipconfig/release
- ipconfig/renew
- Netsh winsock reset
- Netsh int ip set dns
- And finally as you do all the steps and successfully run all the commands, restart your computer and then check if the error ‘could not connect to steam network’ is fixed or not.
- Try to reinstall your steam client after deleting the files- So if you have tried the two above mentioned solutions and they fail to work, then you can just try reinstalling your steam client. So below written are the steps on how you can do it, which will also not delete your gaming data.
- Firstly, right click on the ‘steam’ shortcut which is present on your desktop and select ‘open file location’ to open the root directory.
- Then, delete some files like bin, config, appcache, except some folders and files which are actually used to launch the steam and eliminate the ‘could not connect to steam network error’. They are are follows-
- Steam Apps
- Skins
- Steam.exe
- Ssfn Files
- User Data
- As you delete the files, now launch the steam using the steam.exe launcher and then the steam will itself update and download some files as well.
- And as the process of reinstallation completes, now you can go ahead and check if your issue or error of steam connection still persists or is gone.
- Try to update your network driver- You might not know this, but for ‘could not connect to steam connection’ error to occur, the problematic and outdated adapters are also a reason. So in this case, all you need to do is try updating your network adapter. And to do it, you can follow the simple steps as below-
- First open the window of ‘device manager’. You can do this by following the steps of solution 2.
- Now, right click on the network adapter and then select the ‘update driver’ option which is available in the menu.
- Then, in the window that will pop up after the second step, choose how to search for the drivers. Basically the 2 options are- manually and automatically. You can choose either one which is based on your needs and then just follow all the on-screen instructions to complete the whole process of the update.

No comments yet